HOW TO: Create an email notification for a pending due date – "Reminder"
Summary
This step-by-step article describes how to create an email notification to be sent to the owner of an issue when a "due date" is approaching i.e. a reminder notice.
Methodology
Reminder emails make use of the following RMTrack features:
- Dates can be calculated using the "computed field" option
- RMTrack can cause issues to transition automatically (move from one resolution state to the next) based on any date field in the issues table.
- RMTrack can send email notifications whenever an issue transitions from one resolution state to another.
Steps
-
First we need a reminder date field to use for the automatic transition:
- Determine the "base date" that you want to use for the calculation of the reminder date. This can be any existing date field. Either a 'stock' date field e.g. DateOpened, or a custom date field that you have added to RMTrack e.g. DueDate.
-
Create a new computed field for the reminder date:
- Customize > Issue Fields > New
- Field name: (e.g.) ReminderDate
- Friendly name: Reminder Date
- Description: Date to trigger automatic transitions for email notification
- Security: Computed fields are by definition not updateable. If you want to hide the ReminderDate from certain groups you can select them here.
- Date Type/Representation: Click the “Advanced” checkbox
- Display as: Date
-
SQL Expression: (the following example will compute a date that is 7 days before the DueDate)
dateadd(dd, -7, Issues.DueDate)
(Please request assistance for other variations of computed date fields)
- Note: You can now use the Reminder Date as you would any other field. It can be added to your Data Entry forms, and layouts – but it does not need to be – it can remain an 'internal' date.
-
Now we need to create an automatic transition in the Workflow. We are going to need to create a new Resolution State to automatically transition issues to when the Reminder date arrives:
- Go to Administration > Customize > Workflows
- Open the workflow you want to work with.
-
Create a new Resolution State by drawing a new box on the diagram.
Generally, you will want to create the new resolution state between
the step that you want the reminder sent from and the step that an
issue would normally proceed to. For example, let's say you want to
send reminders to developers that have issues waiting to be fixed...
your current workflow might look like:
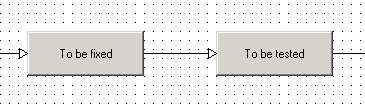 After adding a "Reminder" resolution state your new workflow might look
like:
After adding a "Reminder" resolution state your new workflow might look
like:
 Notice the dashed line and arrow going from 'To be fixed' to 'Reminder';
this indicates that this is an 'automatic transition'.
Notice the dashed line and arrow going from 'To be fixed' to 'Reminder';
this indicates that this is an 'automatic transition'.
-
To create the automatic transition, draw an arrow from one resolution
state to another. On the Transition Properties dialogue box, switch
to the "Automatic" tab.
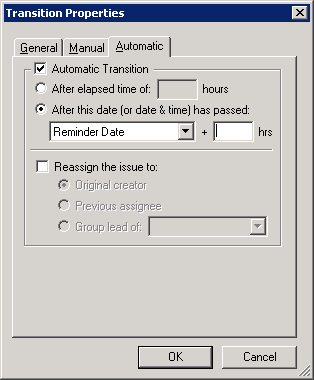
- Check the Automatic Transition checkbox.
-
There are two ways to automatically transition an issue:
- After an elapsed period of time i.e. the issue has remained in the current resolution state for 'n' hours
- After this date has passed i.e. after an issue field date has passed – in this case 'Reminder Date'.
- You may choose to re-assign the issue at this point or leave it assigned to the current assignee. Re-assignment is good for escalation of issues, leaving it assigned to the current user is good for reminders.
- Remember to create a manual transition from the Reminder state to wherever it would have gone without the reminder. And you probably want to leave the original transition (in case the work is done before the reminder date).
- Save your workflow changes.
-
Finally we need to create the email notification rule.
- Go to Administration > Projects > E-Mail Notifications.
- NOTE: The rule that we are going to create is based on a workflow transition therefore it MUST be created at the Project level as each project can use a different workflow.
- Select the Project for the rule from the Project dropdown.
- Click the 'New' button.
- Give the rule a name e.g. Reminder
-
Select an email template for the rule to use (for more information on email templates, please see the Administration guide).
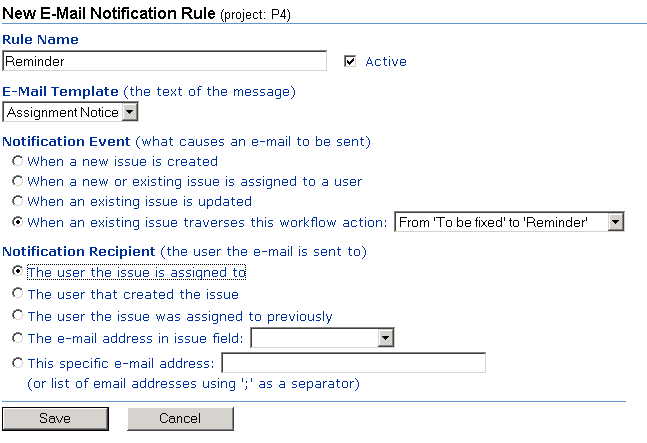
- Select the 'When an existing issue traverses this workflow action' and select the appropriate transition from the dropdown.
- Select the recipient for the email. For reminders this should generally be 'The user the issue is currently assigned to'.
- Save the email rule
That's it! In the above example, whenever any issue reaches a date 7 days before the Due Date, RMTrack will automatically move the issue to the Reminder state. That move will trigger an email to be sent to the user that is currently assigned the issue. The user can then complete their task and move the issue on as they normally would.
Applies to
RMTrack Issue Tracking - All versions